A Complete E-Commerce Mobile Application powered by Backend CMS
A Complete E-Commerce Mobile Application with Material Backend CMS
Created on : 4-Sep-2017
By: The Code Factory
Email: rupen@techintegrity.in
Skype : rupenm (Bangalore)
What's App : +91-8866045386
Cell : +91-8780784484
We at TheCodeFactory ( A Product division of Tech Integrity Services ) believes in delivering benchmarking cutting edge solution’s which are scalable with large audience and easy to understand and can save 1000's of your devlopers hour's.
A Very Detail explanation is available here with video as well.
Table of Contents
- Overview
- Complete Data Flow Diagram
- Database design's
- Features
- How to set up and configure server side
- How to setup and Configure X-Code project - iOS Code
A) Overview - top
A Complete E-Commerce Application build with Native iOS is for sale with 100% source code. This app is one stop go for your E-Commerce business. Below are some of the highlights of the app.
- With this app you can sell ANY normal product's AND/OR customised product where you need user to capture his image , text etc. ( Like Pedals with Photo's etc or Mobile Phone Panels with user's photo printed etc. ).
- Single domain license - This includes full source code for iOS ( if purchased iOS ) along with backend CMS & API and/or Full code for Android ( if purchased Android ) along with backend CMS & API. Andriod sold externally.
- Pure Native Code implementation.
- Pure Native Code implementation.
- Easy to change currency, tax etc. from Backend.
- 100% white labeled solution.
- Unique animation, transition between screen, Cool and Sizzling UX and More important its very FAST.
- We are available for additional services and customization at extra price’s.
- Best fit for any industry (To show case we did sample data entry for below categories and products).
- Clothes & Garments.
- Any type of Hardware & Software.
- Toys and Accessories.
- Jewellery and Customised gift where user can submit their images to be printed.
- New - Printing Solutions and Customised Gift where user can submit their user input like pictures , text etc.
- Selling Food items.
- Selling Electronic items like Mobile Phone , Air-condition , Refrigerator.
- Selling products like SOFA-Set , Home Appliances.
- Sports and Fitness Equipment.
- Musical Instruments.
- All kind of Books.
- Men and Women Watches.
- Men Wallets , Women's Clutches , Laptop Bags , Air bags , Suitcase's , Belts , Mens Shoes , Women Shoes , Sandel. etc.
This are sample product data entry just to show case that this app is designed to fit for any industry
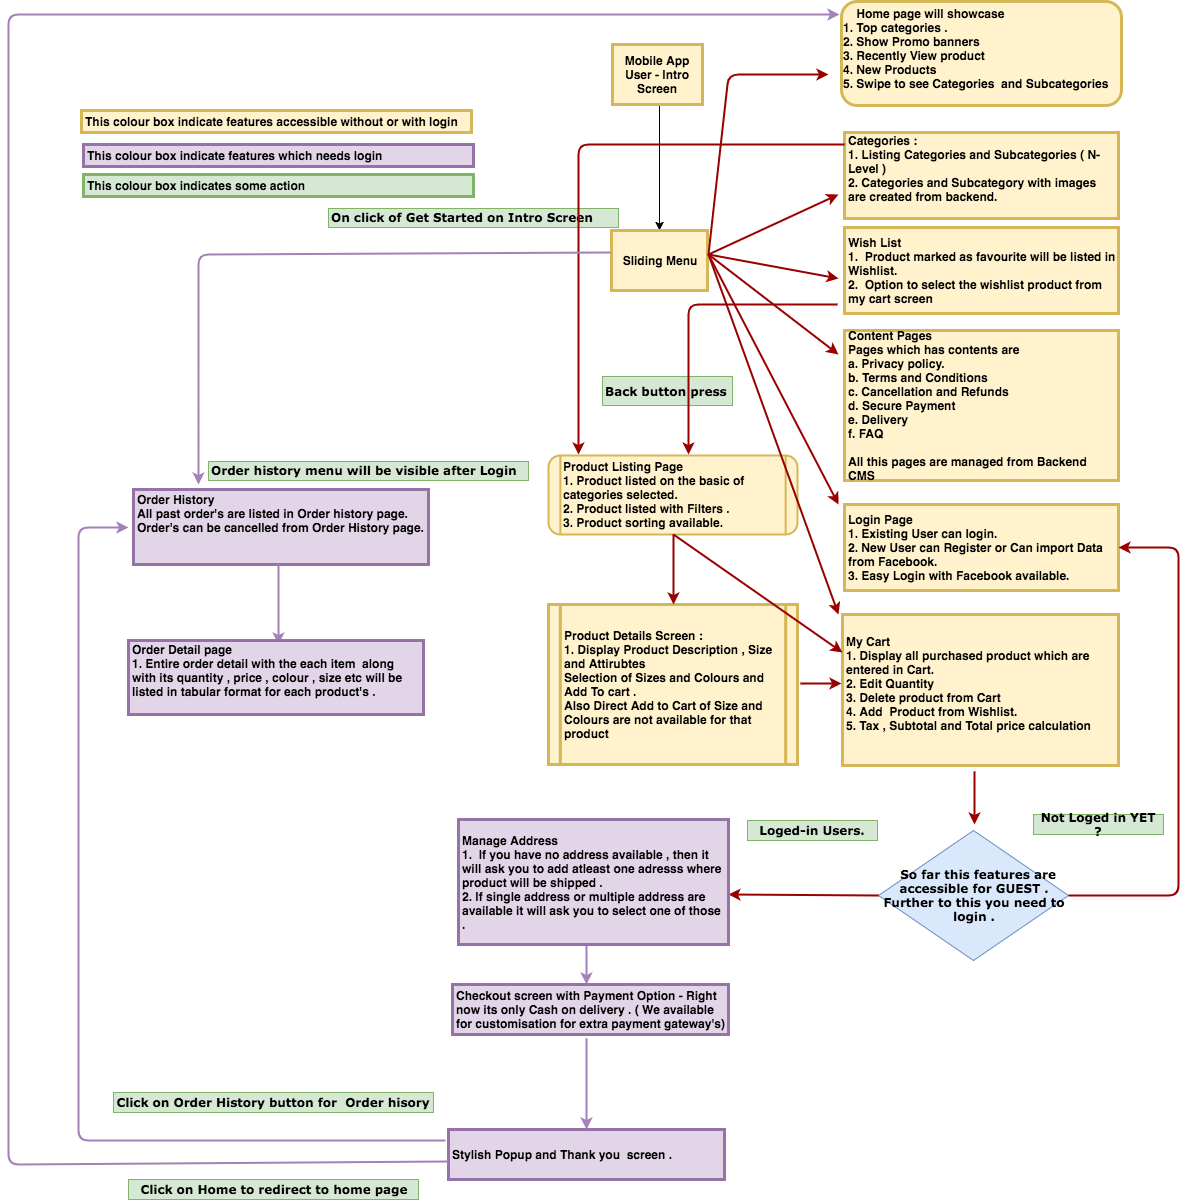
B) Complete Data Flow Diagram - top
Picture speak's better then text :)
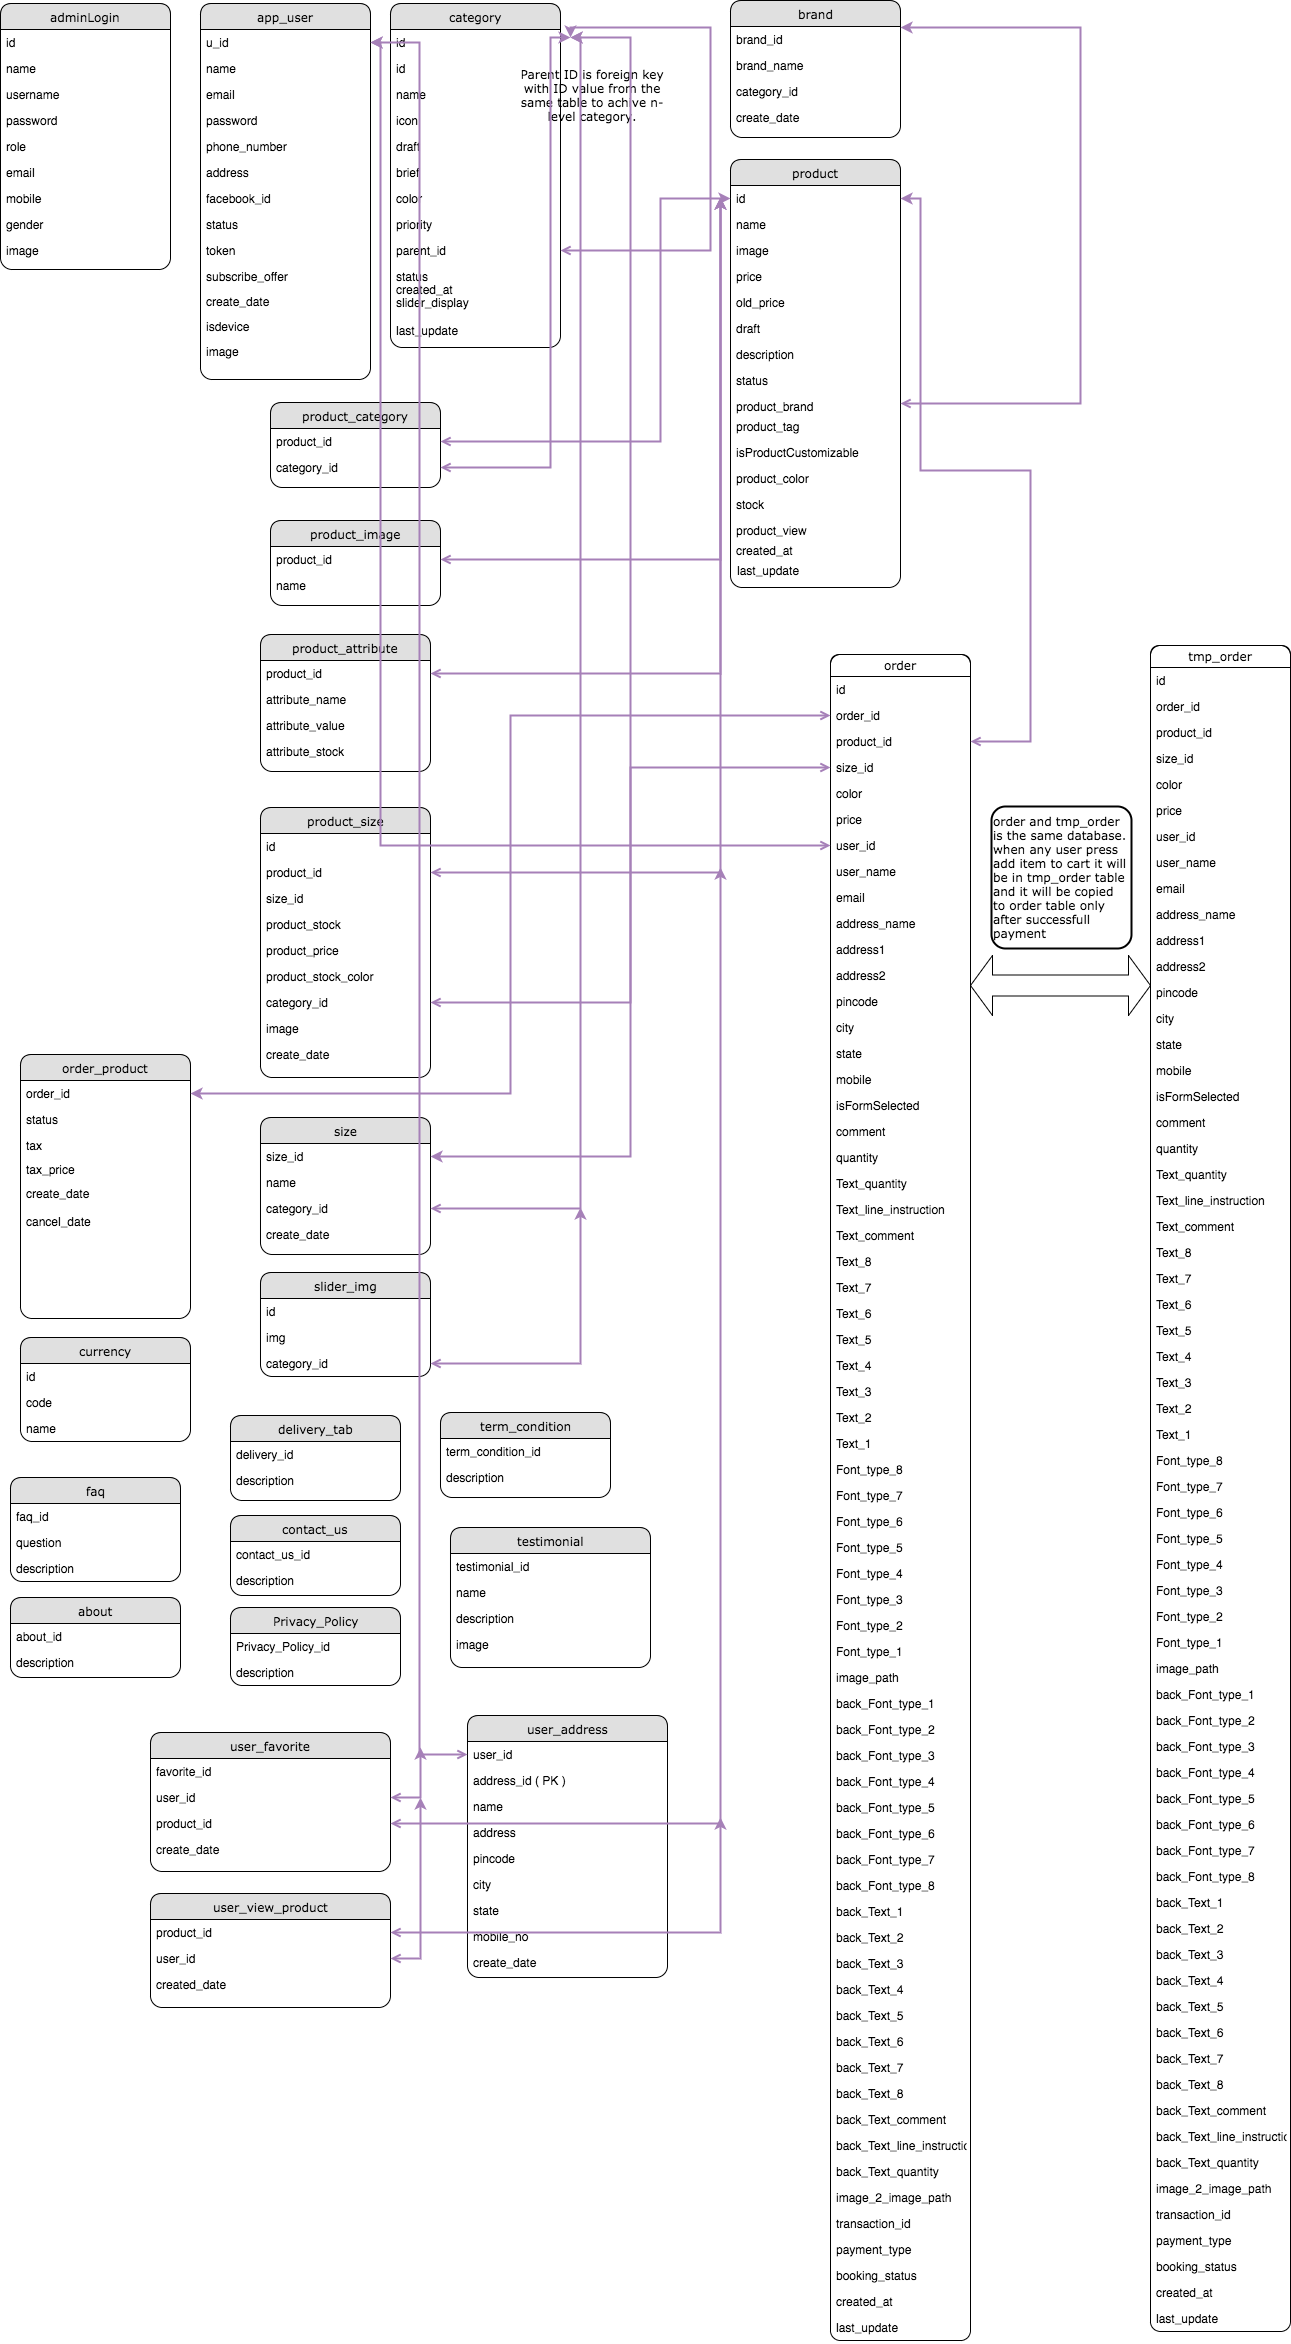
C) Database Design's - top
Entire Database design with primary and foreign key representation.
D) Features - top
Below are some of the great features of the app.Features included in iOS App
- Implement with Native iOS with Material Design and Autolayouted XIB's.
- Stylish interface, cool animation between between views and awesome transition to match top notch international quality.
- Beautiful sliding Menu for easy user experience.
- Cool splash screen with text slider's
- Stylish Home page design to match top charts app with below features.
- Top rotating featured product's image's and link to product categories/sub-category.
- Listing Top new category in cool table view.
- Sliding between featured categories from home page.
- Support n-level category and subcategories.
- Listing product's in gridview. Infinite product listing with scroll to load more products and pull to refresh product's.
- Dynamic filters for brands, categories, tags, colour and price ( If fiter's available for that category ) .
- Sorting product's on the basis of What's New , Popularity , Price : Low to High , Price : High to low .
- Beautiful animation on "Add to Cart ".
- Product Description page - Neat Design with support for dynamic attributes and values, multiple product image with option to zoom on click, option to add that product to wishlist and much more.
- Option to add any product to wishlist ( change to favourite as per your need).
- Shopping Cart with option to add quantity, remove products.
- Order History - Display's all order which are made so far from that user account's.
- Order Listing - On click of Order history it show list of items which were added in that particular product with size and quanity selected.
- Checkout screen.
- Manage address / Add address support.
- Suport normal login and login with facebook.
- To match apple UI Guidelines we have given an option for "Sign in with Guest" and we can ask user to login only if he press checkout.
- Dynamically managable content screen from backend CMS.
- Stylish Angular 2.0 & Bootstrap Based CMS , Support & easy to install latest Php 7.0. Coded with codeignitor MVC framework.
- A Very Unique Dashboard to show Number of user's, categories, order's, products's ,statics of users every month, product pruchase every month and much more.
- Support Tree View for Managing N-Level Categories and Subcategories.
- Support Customize Product's ( like Jellwery , Customized Gift etc.. ) and Normal product's.
- Option to add products under multiple categories.
- Manage Order screen.
- Display all order and on click of that it opens detail page which is called order listing.
- Order listing show all orders which were in the cart for that transaction. It shows the customized order details as well along with images and text.
- Support tax and currency as well.
- Support Managing Home page banner from CMS ( With details description ).
- Option to set any currency from CMS.
- Option to make product taxable with fix amount and percentage.
- Options to add Reviews / Testimonials from Backend.
- Managable content pages like FAQ, Terms and condition, Privacy policy.
- Manage Product page - Product can be created with various attributes on the fly with option to add brands, size, colour, available stocks, tags, and categories.
- Support product stocks for each size,colour and quantity.
- Support Managable Brands, N-Level categories, Managable stocks, Managable colours and Tag's.
- Dynamically managable content screen from backend CMS.
E) How to set up and configure server side . - top
A Brief about the CMS & API Code-
Some of the pointers worth knowing :
- We have used Codeigniter Php framework for Backend and we have used MYSQL Database (https://codeigniter.com/) .
- We have used latest Php 7.0 Version which is stable and fast when it comes to performance .
- Also we personally suggest to host this app on cloud server.
- There are lots of great player out in market like linode.com , digitalocean.com , amazon ec2 .
- A good Cloud with at-least 2 GB Ram is a good plan to start with , you can always keep track of your CPU Usage and upgrade your plan accordingly.
- There are many player like microsoft azure who has pay as you go model and they can give you uptime and faster response .
- To the best of our knowledge we have attempted to give the best architecture to this app by using MVC model to Web and API , Making Modern Material CMS , Designing the Database structure in such a way that it can fit to any business requirement , this app will be a perfect fit right for small scale business to any large scale business.
- Moreover this comes with full fledge sample data entry for you to easily understand how you can enter data to fit any product.
-
Pre-requesties to set up server side code:
- We need LAMP set up. LAMP stands for Linux Apache MYSQL and PHP 7.0 .
- We recommend this tutorial for installing LAMP set up on your ubuntu cloud server (https://www.digitalocean.com/community/tutorials/how-to-install-linux-apache-mysql-php-lamp-stack-on-ubuntu-16-04 ) .
- Once installation is done go to FTP and open /var/www/html and inside this you can upload the content of "Web-Server-Code-Final" folder. There are 2 Folders "Without Data" and "With Data", name itself makes out that the folder with data has test data entry done. This comes with images and database as well. This is just to get proper hang of product.
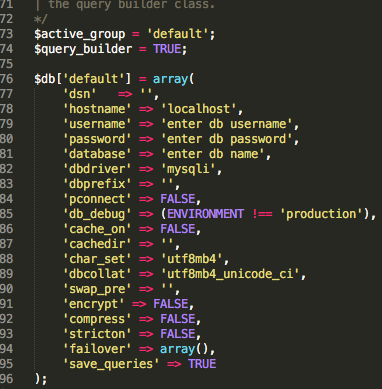
- Now open application->config->database.php and change your database user name , database password , name of database.
- Now open application->controler->webservice.php(enter title,enter email,enter email password).
Change title to below lines
Line number 705 -> $subject = 'enter title Forget Password Request.';
Line number 721 -> enter title® is successful.
Php mailer settings Line number -> 8427

You can use GMAIL's SMTP settings or you can use Amazon SES setting's .
You can search the "title" tag and repalce with name of your product
Line number 8156 ->$title="enter title";
Line number 8159 -> $subject="enter title";
Line number. 8176 ->alt="enter title" border="0"
Line number. 8178 and 8179
Line number 8411 ( Applogize if i miss any thing . )
- On top of this you have to change "title" tag to each php page by going to application->view->(change all file title) one by one.
-
Below is the .htaccess file you shoud use - Enable mode-rewite to on and copy and paste the below file into .htaccess and add to to root of your project.
RewriteEngine On
RewriteBase /
RewriteCond $1 !^(index\.php|resources|robots\.txt)
RewriteCond %{REQUEST_FILENAME} !-f
RewriteCond %{REQUEST_FILENAME} !-d
RewriteRule ^(.*)$ index.php?/$1 [L,QSA]
# If we don't have mod_rewrite installed, all 404's
# can be sent to index.php, and everything works as normal.
# Submitted by: ElliotHaughin
ErrorDocument 404 /index.php
username : admin
password : admin
F) How to setup and Configure X-Code project - iOS Code . - top
A Brief about the iOS Code-
Some of the pointers worth knowing :
- We have use Cocoa Pods for installing dependencies . (https://cocoapods.org/).
- This are the sample pods included in this.
-
- pod 'IQKeyboardManager'
- pod 'SlideMenuControllerOC'
- pod 'UIFloatLabelTextField'
- pod 'INSPullToRefresh'
- pod 'AdobeCreativeSDKImage'
- pod 'AFNetworking', '~> 3.0'
- pod 'FBSDKCoreKit'
- pod 'FBSDKLoginKit'/li>
- pod 'FBSDKShareKit'/li>
- pod "MWPhotoBrowser"
- pod 'MARKRangeSlider'
- Open XCWorkspace Project to open the code .
- A Brief about folder structure .

- Looking at the below screenshot the quality of the code is clean and its been managed in modules , each folder represent the module . Name of each module is named under their folder which is user friendly and gives a clear understanding about the code . Name of the folder is keep self explationary and give you clear idea about the code .
- We have used Custom fonts and all fonts are placed inside Font folder.
- In order to make the build size smaller we have made a very nominal use of images and all images are kept under “Images” folder .
- To reskin the app to applestore :
- You need to change the icon which is inside AppIcon folder.
- Change the graphics which are in Images folder.
- In the next step we will walk you through how to install server side code , But once you have install server side code on your cloud or dedicated server . All you need to do is open “StaticClass” folder -> Open StaticClass.m File -> and change the below function

- Here change the iP-address to your domainname or iP-address and that will point entire app to your server. The first one is for API and 2nd one is for image base path .
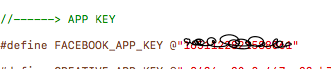
- To change the facebook id you need to open .plist file and change as showed in the picture. This will start pointing to your facebook id.
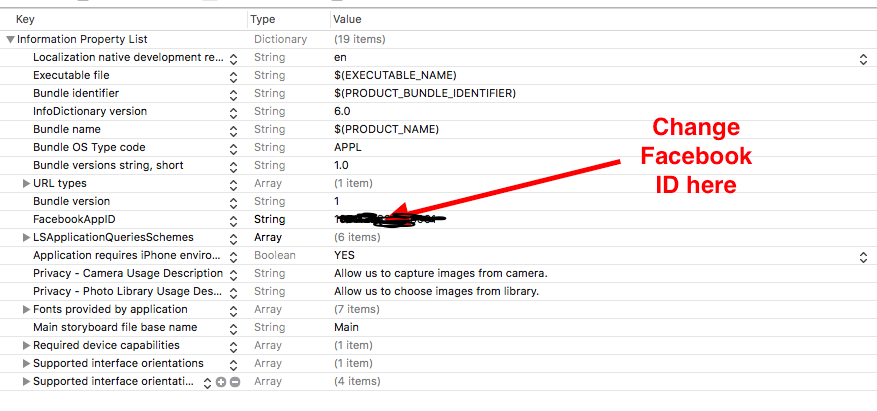
- ALSO Open PrefixHeader.pch file and replace the facebook id here as well.
-
We have also used Aviary Editor for Fine Tuning the image before it get submitted to admin . Aviary can give extra piece of chrisp to the user . Login to https://www.aviary.com and create free account .
( precise link is this https://console.adobe.io/integrations/49149/32101/overview ) . Once you login click on MyApps -> ( Recently change to https://console.adobe.io/) . Click on Below steps showed in screen shot and that will create the app in aviary .
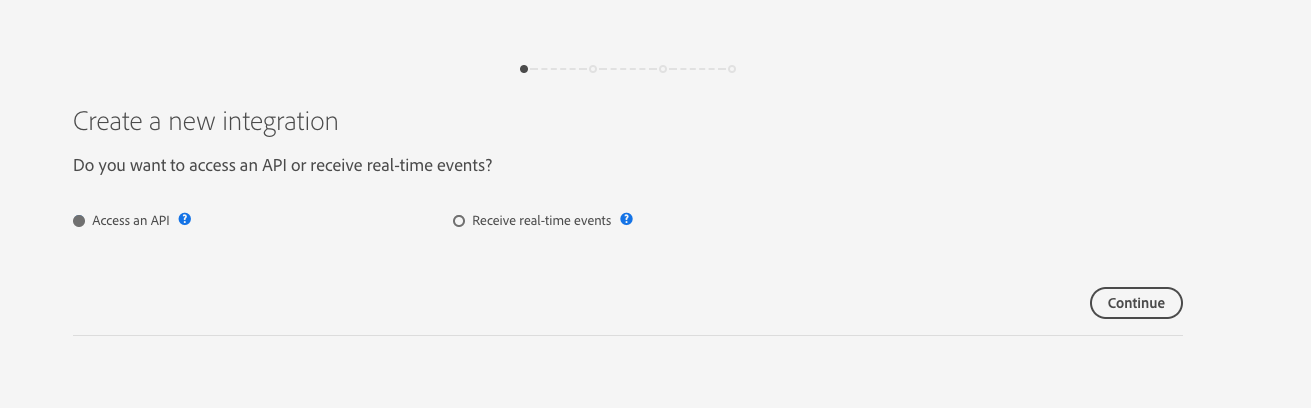
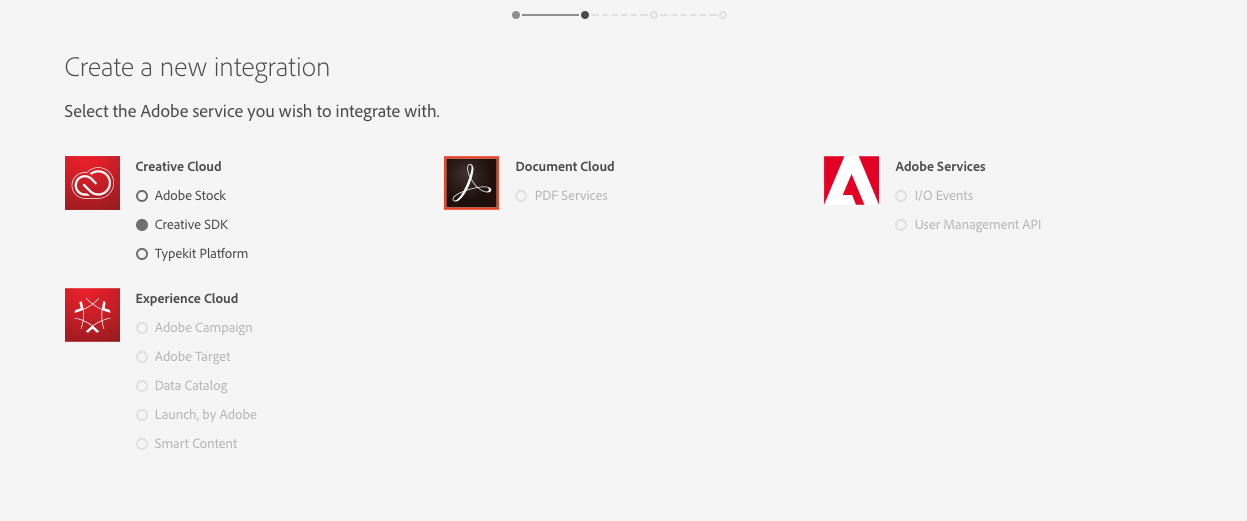
- Fill this form and you get
- API KEY
- Secret Key
- Default redirect URI
- Redirect URI pattern
- Open PrefixHeader.pch file and replace here as given in screen shot.

-
To change the Color of the App
- You can edit the colour in Story board of the project.
- Also you need to edit the color in PrefixHeader.pch.
And edit below line
//----> theme color #define appMainColor [UIColor colorWithRed:186/255.0 green:138/255.0 blue:255/255.0 alpha:1.0]
Thats it :) Clean the Build and run the app and it will be all ready to rock .
Once again, thank you so much for purchasing this theme. As I said at the beginning, I'd be glad to help you if you have any questions relating to this theme. No guarantees, but I'll do my best to assist.
Rupen Makhecha