Piano Tiles
Thank you
Piano Tiles
Quick Start
The project template has been developed and run on Unity 2017.3.1f1, therefore, you should use this same version to minimize the headache :D. But it’s Unity, so using different version is fine, but I can’t guarantee that there is no error on those version (it’s unlikely to have much error anyway). That’s it, then, ahoy to the process!!!
Folder structure
After extracting the zip file, navigate into it, you will be greet with structure like
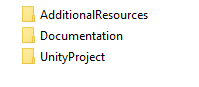
The name of the folders should be self clarifying, from now onward, we should be working in the UnityProject folder.
Inside the project, the folder structure are as follow

Every scenes of the project is in the “Scenes” folder, so do scripts, animations and particles (in their respectively folder). Or if you feel lost, you could always use the Search bar in Unity
First start - Error and Warnings
Open Unity, and open the project inside the folder, maybe you will see some error like this

Then, be sure that those errors are harmless to the project, maybe it’s bug from Unity or something, you can safely ignore it.
About the warnings, I’ve tried to clear all of them but some are left untouched since it’s belong to NGUI (pretty old version of NGUI, and can be update to make them go aways but I don’t think it’s worth the hassle. If you want to update it, make a request on the app page and send me your NGUI package).
Safely press “Clear” to keep the working environment safe.
First scene to start
Open the scene “ScenesManager” in “Scenes” folders, this is the bootstrap, without it, the game won’t run. Please make sure it’s the first scene in Build settings, like this

Or else your game will have weird behaviour.
When you want to start the game in Editor, remember to switch to this scene first, then press “Play” to run the game. Enjoy the game :D
Important note on building the game
Maybe the most important note in this document. If you want to build the game (for any platform), you MUST open the SceneManager first, then press build, or else the game will misbehave. Sadly, I don’t have enough intelligence to know why or what causing that, sorry.
IL2CPP
This template make use of IL2CPP feature of Unity to provide good performance while still be light on battery life. In exchange for that, the building process take a little more time that Mono. On my dev computer with i5 3450 + 8GB RAM, the building process took 10-15 minutes. You could try to use Mono, but I strongly recommend to use IL2CPP since this mode yield better binary code.
How is the game organized
Scene Management
The game manage its scenes by using third party asset from SSSystem, if you want more information about this, please consult the asset’s page.
The main idea of scene management is treat every scene like a layer (as in layer in Photoshop or Gimp), you can overlap these layer to create the game as you like, while keep everything separate in different files so that a whole team can work on the GUI of the game at the same time. In additional, you can load and unload the scene as needed, save memory, and still have lots of UI elements in your game.
I’ve provide a wrapper to navigate between the scenes, please refer to SceneManager.cs scripts
Coroutine Replacement
This game make use of coroutine a lot, as a result, it generate lots of garbage each frame if default coroutine is running. I’ve switched to another solution to use coroutine but generate near zero garbage each frame, namely More Efficient Coroutine, you can take a look at its page for more information.
Scenes and Popup
As mentioned above, this game use SSSystem to deal with scene navigation, as a result, all scenes and popup must followed the SSSystem’s guidance. Each of the scene or popup has a controller to deal with its logic, all those controllers are in the “SceneController” folder (inside Scripts folder of course)
Game Managers
The game has many features, lives, diamonds, daily reward…, each of them has a manager to manage its functions. All these managers scripts live in “Manager” folder inside Scripts.
How to monetize
The game provide ready-to-use integration with UnityAds, you can easily change the ID of the ads and start monentize right away.
To change the ID, go to SceneManager scene, look for the object AdsHelper

Then, insert your game ID and zone ID as request, done.
Moreover, there is a prebuilt class called AdHelper contains code to use Mopub service, so that you can easily integrate ads mediation into your game. I will not provide update for this feature since not everyone need it.
How to reskin
This is the most asked question, and at the same time the most easy (but time consuming) task. Behold.
This project make use of NGUI’s atlas feature to save drawcall on its UI. You can easily change the game’s skin by any of these way
The easy way - Edit in-place
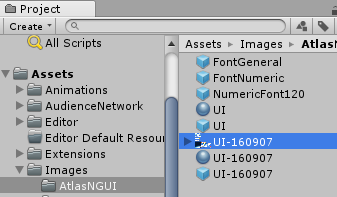
The main atlas file is located at “Images/AtlasNGUI/UI-160907”
Directly edit this file (using Photoshop or GIMP) will result in immediate change in the game’s visual
The recommend way - Edit the UI atlas
To follow this path, you must have knowledge about NGUI atlas and how to edit it. If you worked with NGUI before, then you knew the drill. If not, here is a little guidance (you still have to do most of the work yourself, though).
Open the Atlas windows by clicking on menu NGUI/Open/AtlasMaker

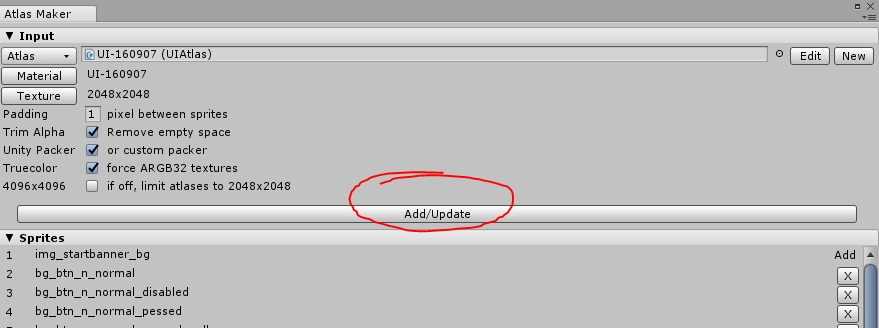
If you don’t see the interface like mine above, then click on the button “Atlas” in the top left of the widget, then choose the UI-160907 prefab (this is the main atlas for the game).
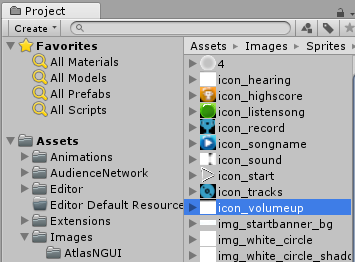
On the project view (the atlas maker windows must stay open), select the sprite you want to add into the atlas (which will be used to change the game UI into), like so
Then, on the AtlasMaker window, click on the “Add/Update” button
After that, the sprite is ready to use. Select your button or GUI element, then choose the sprite

Repeat the step for every sprite you want to change, and the game is new :D
How to add new song/level
A song/level in this project is taken from a MIDI file. Yep, MIDI.
A MIDI file is used to play the actual music, AND to display the notes in the song. The song file is just MIDI file, but with some changes.
If you prefer the video tutorial, then do so here (https://www.youtube.com/watch?v=o5R3q_RzdNw)
NOTE: before following the tutorial, you must replace the SongConverter.cs file in the project with this one https://gist.github.com/miodevs/1285be56b32b19cf83f3aee9b71ddb14
Choose your song
Look for a song of your interest, then find its MIDI version.
Please be aware, the MIDI file must not be too complicated, this project work best with the MIDI with only 1 instrument, Piano. If you use MIDI composed for Guitar, the project still work but the song itself will not that good anymore (imagine using Drum to play song for Piano only, it’s like that) .
Edit the MIDI
We had the MIDI file, we need to modify it, and to do this task, we will use a third party program. I use MIDI Editor from http://midieditor.sourceforge.net/ , but you can use any program you are happy with, as long as it can edit MIDI file.
The general workflow for making song for this project is raw MIDI (step 1) => Edited MIDI (step 2, current step) => Converted file (later step).
To make the MIDI file ready to be converted, make sure it only has 2 track, with track 0 is the playback data, and track 1 is the notedata. NoteData will NOT be play (aka muted), but will be used to display as tiles in the game.
It’s a little bit difficult to understand all that at first, let’s do some song. I chose the “The Beginning” by Ryan Arcand (a homeless man). The MIDI file can be found on the Internet, here is a random version of it (midi)
Let’s open the midi file for “The Beginning” song, using MIDI Editor. You will be welcomed with something like this.

You can see that we have only 2 tracks in this file (look at the track view, on the right side of the screen, Track 0 and Track 1).
In those tracks, everything belong to track 0 will be blue, track 1 will be yellow (like the color of the Track). If you want to view events from any one of them, you can click on the little eye icon to turn off every other tracks (like in Photoshop).
In the main window, each horizontal bar you see there is a MIDI note, with its duration determined by its length.
When a note is selected, it will turn into dark-blue color, and its details will be displayed in the Event window, located at the lower right of the main window, as you can see above (the first note is selected)
First step after you open any MIDI file, is to clean it up, so, in the main window, scroll all the way down to the bottom, and delete every other events, leave only those as follow. If for some reason, the file you edit is not playable, this area should be check first to make sure no events left hanging
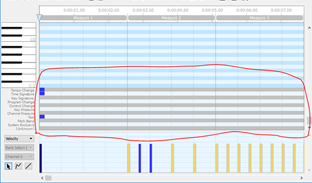
We will talk a bit about how the project will read MIDI files into its level data. It will care about the data on the ‘view track’ first (track 1 in our case), and for each MIDI note in this track, it will try to read equivalent note in the playback track (track 0 in our case) and combine them into a package. Each package will then be presented into a TILE in our game. Every time the player touch a Tile, the project will take MIDI note from the package out and play them. That’s the big idea of the project.
The first step you should do is to duplicate the playback track into another track, we will name the newly created track “View”, and the old one as “Playback” so it look less confusing, but the rename process is not mandatory, you can do as you please. Here is a little screenshot for better visual.

After you duplicate the playback track, all its event will be copy into View track; to prevent mistakes, we shall hide this track and will only make our work happen on track View. You can do this by clicking on the little eye icon below the track name on the window above.
To make Tile data for the game, all you need to do is to delete redundant data from the view track, left only the one you need.
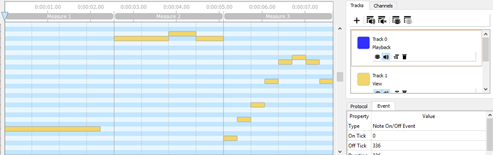
As you can see in the screenshot above, in track View, all note appear as a single note. Why is that? Because single note here will be parsed into Normal Tile (black tile) in game. And every time there are 2 notes on the same timestamp, it will be interpreted as double tile in game. For example, formation like this will make it a dual tile (remember to mark them at the same time).
Next thing you need to be careful about is the duration of notes. Each note will have its own duration, in ticks (click on a note to see in its detail view). And each level will have a base value to determine if a note is a single one or a long one by compare its duration with this value. For example, the level “The Beginning” has base value of 48 (more about this later), then each note with duration of 48 ticks will be considered single tile, any note with longer duration will be long tile, and any note with less than the base value will just be ignored. And since this project has tolerate mismatch, notes don’t have to have duration exactly like the base value of the level to be consider normal tile, but it should be. Current tolerance is 0.125 but you can edit the source code to change the behavior if you want in file SongConverter.cs, line 22.
Entering metadata
After editing the MIDI, you are half way through the process. The other half is to input metadata for the song. Please refer to the store.csv file in Resources folder. An important note here is that since it’s a CSV file, you can use any sheet program to edit it, but you should use LibreOffice or Google Sheet to do the job, since Microsoft Excel will messed up the file (but you can fix it by using Notepad++ to save as UTF8 without BOM).
Opening the CSV file, you will have some column to fill in, as followed
|
ID |
id number of the song, not in used, but maybe you will |
|
name |
name of the song |
|
author |
author or origin of the song |
|
songURL |
the URL to download data file, in case you want your game to fetch songs online |
|
fileVersion |
the version of the current song, used to check if the song need updated or not |
|
storeID |
a unique string for each song, will be used as file name to look for midi files |
|
price |
how much coin to unlock it |
|
starsToUnlock |
how much star a user needed to unlock it |
|
maxBPM |
maximum speed of the song |
|
tickPerTile |
the base value of the MIDI file, note with this duration will be consider a tile |
|
speedModifier |
if you want a specific song to run faster, put a value larger than 1 here, not in used |
|
speedPerStar |
a json string to specify speed for each star of the song, not in used |
|
type |
is this song hot (1), new (2) or normal (0) |
After filled in the details in CSV file, save it, put the MIDI files in the folder LocalData/piano-songs/midis, note that this folder is outside of the Assets folder of Unity. The name of the midi files must match with the storeID of it.
Then, run the game in the editor, and press the button Convert All Songs in Home scene. If everything is fine, a new set of songs will be available in LocalData/piano-songs/levels. You can copy them into Resources/songs and start playing your newly created masterpiece.
New requested features
Here are all the features that has been requested from buyers, I grouped them into a new section for clarification purpose.
Admob full-screen ads
Please be advised, this section here is to help you setup the admob ads faster, and only that. If you want to have a more flexible way to deal with ads, then there is some asset on the Unity store that maybe worthy. Or, best of all, I suggest that you take a look at Mopub for mediation, and never look back.
This add-on will help you setup Interstitial ads from Admob faster. First, download the helper class and keep the file’s name as AdmobAdsHelper or Unity won’t compile.
Then, save it into the project, and open scene SceneManager. Next, look for the AdsHelper object in the hierarchy and drag the AdmobAdsHelper script onto it.
You should have this as result

The properties on this class are pretty self describe. You input the AppID and the AdUnitID from Admob into these field then call the code to show the ads when needed.
In the Config section, there are currently 2 option. AutoRequestAdsOnInit will do as it said. The delayToRetryRequest will automatically wait for a specified time before trying to request the ads again. You should keep this value high enough because requesting ads from Admob sometime cause slow down in performance of the game.
After setting it up, you must replace the call from UnityAdsHelper and redirect them toward this class to receive ads from Admob.
How to do it? Easy, open the UnityAdsHelper script in visual studio, then find references to these two functions:
Initialize
ShowInterstitialAds
Then, at the place where you found them, change it to call to AdmobAdsHelper. Done.